A2000 Support


Top Five FAQs
Possible Causes:
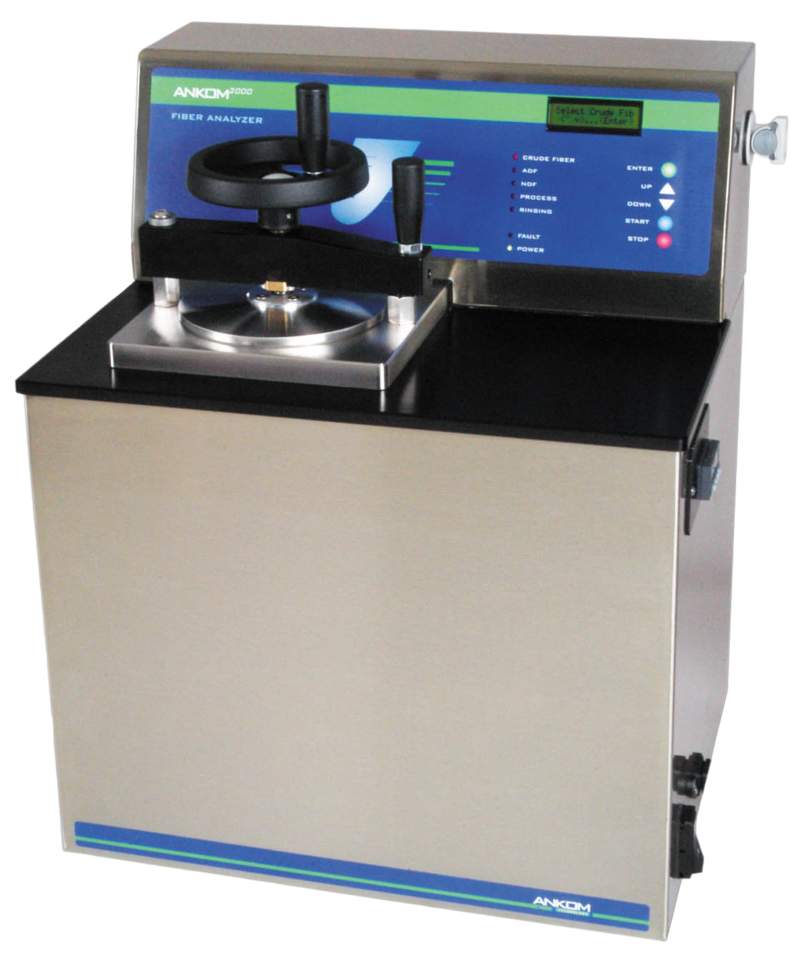
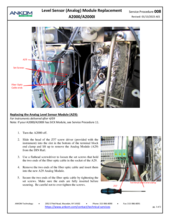
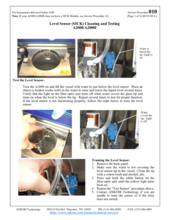
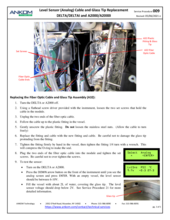
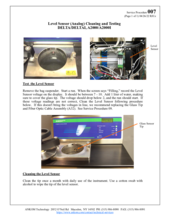
(1) The level sensor has failed to detect the liquid that is in the vessel. If the vessel is full and this fault screen appears, press <STOP> to drain the fluid. You may want to capture the solution and re-use it. Refer to DELTA Service Procedure Analog Level Sensor (Black Model) (AS008). Or, see A2000 Service Procedure Level Sensor (SICK) Cleaning and Testing (AS010) for SICK brand level sensor (Blue) installation instructions.
(2) Water or solution supply is inadequate. Replace the cubitainers if they are empty. Check to see if the water supply is turned on.
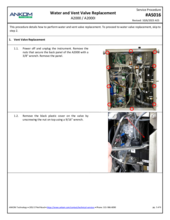
(3) Water supply valve may not be functioning. With the bag suspender removed from the vessel, press <ENTER> to try again. Once liquid is observed flowing into the vessel, (replace the bag suspender if performing a rinse) and close the lid. If no liquid is flowing into the vessel, the fill valve or the water valve may not be functioning. Refer to A2000 Service Procedure Water and Vent Valve Service (AS016).
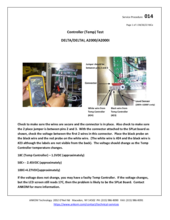
A "Low Pressure" error occurs when the vessel does not have at least 3 psi after 13 minutes.
Possible Causes:
(1) The lid was not tight. You do not have to over tighten the lid, but it needs to be snug. Usually, a finger tight + 1/4 turn is adequate.
Check the Lid O-Ring and replace it if damaged.
(2) The vessel did not heat, or you have a leak, therefore no pressure was generated.
To test:
- Disconnect the solution supply tubes on the left and right side and start a run.
- When the screen says "Filling" pour in 2100 ml of hot soapy water (dish soap works best) over the bag suspender to cover the level sensor. Agitation will begin. Close the lid.
- Record the temperature and pressure.
- Wait 5-8 minutes and record the temperature and pressure again.
- Place the open ends of the drain tube and vent line in separate small buckets of water. Do you notice any "bubbling" as the Instrument heats?
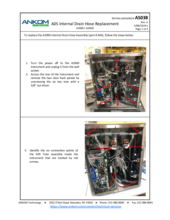
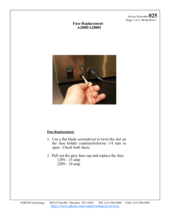
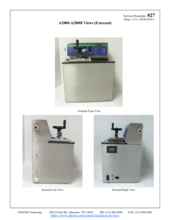
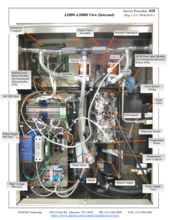
- In the back of the instrument do you notice any bubbles in the A and B Clear Valve Tubing as the instrument heats? For a picture, refer to A2000 Service Procedure A2000-A2000I View (Internal) (AS028). If bubbles appear in the tubing, see A2000 Service Procedure A and B Valve Cleaning (AS004).
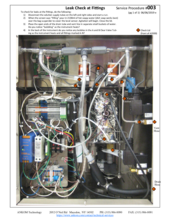
- In A2000 Service Procedure Leak Check at Fittings (AS003), the diamond markers indicate the assemblies that have attached fittings that need to be checked. Place a soap and water mixture around the fittings. Do you notice any "bubbling" around the fittings?
- If the vessel has pressure but the display is still reading zero, the pressure sensor and cable may need to be replaced. Contact ANKOM at (315) 986-8090 and ask for a Technical Service Representative.
Possible Causes:
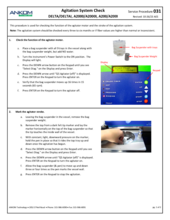
(1) The bag suspender is worn or not properly functioning. Refer to Service Procedure Bag Suspender Check (DES006).
(2) The vessel is overfilled with solution.
(3) The level sensor is not detecting the solution.
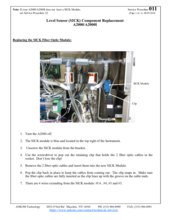
To service the blue, SICK model, refer to A2000 Service Procedure Level Sensor (SICK) Cleaning and Testing (AS010)
To service the black, Analog model, refer to Service Procedure Level Sensor (Analog) Cleaning and Testing (DES007).
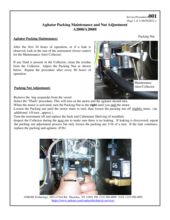
(4) The motor stopped turning. Check the packing nut to make sure it is not over-tightened. Refer to A2000 Service Procedure Agitator Packing Maintenance and Nut Adjustment (AS001).
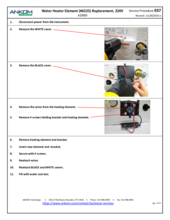
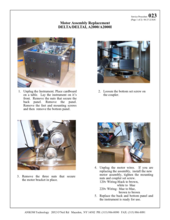
(5) The motor needs to be replaced. Refer to Service Procedure Motor Assembly Replacement (DES023).
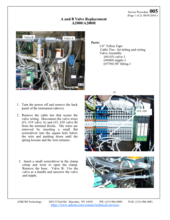
(6) Fill Valve A or B may be "stuck" open. Turn off the instrument and slowly open the lid. If liquid is still flowing into the vessel, valve A or B may be stuck open. Refer to A2000 Service Procedure A or B Valve Replacement (AS005).
Possible Causes:
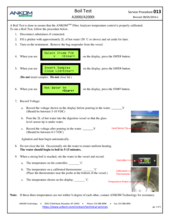
The solution temperature has exceeded the maximum limit. Perform the boil test detailed in Service Procedure Boil Test (AS013).
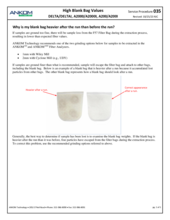
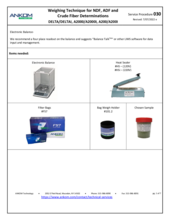
The Blank Bag Correction allows for a weight adjustment based on actions that take place during solubilization. The resulting factor increases or decreases your sample bag weight. To determine the blank bag correction, include at least one empty, sealed, and weighed filter bag (blank bag) with your run.
After the samples and blank bag have been through the solubilization process and dried as required, calculate the blank factor as follows: divide the final weight of the blank bag by the initial weight. If the samples have been properly prepared, blank factor values should fall below 1. If blank factors are greater than 1.0, refer to DELTA/A2000/A200 Service Procedure High Blank Bag Values.
Troubleshooting? Let us help!
For the most efficient and quick way to determine what your instrument issue is, it is important to fill out the diagnostic questionnaire below and submit to our analytical service form. Our team will review and get back to you with help!

Parts & Consumables
Browse the A2000 Product Catalog for associated parts and support items
Preventative Maintenance Kit
Essential items needed to keep your instrument operating smoothly
Instrument Performance Test
Check samples ensure proper function of the instrument and correct procedural technique

SDS Sheets
View available product documentation and safety information

Service Procedures


How can we help?
Don’t see what you need on this page?
Search for a specific topic to search all resources.