A200 Support


Top Five FAQs
To ensure that the controller settings are correct, refer to A200 Service Procedure Controller Reset Procedure (FS002) for instruments purchased pre-9/03, or, see A200 Service Procedure Controller Menu Setup (FS001) for instruments purchased post-2003.
If the settings are correct, you will need to test the controller and calibrate it. To test the controller, refer to Service Procedure Bag Suspender Check (DES006).
The instrument is experiencing a high-temperature fault. If your controller is set to 100°C, there are two possible reasons for this fault.
(1) The agitation is not working properly during an assay.
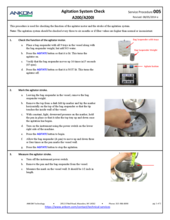
To check the agitation during an assay, remove the back panel of the instrument and do the following:
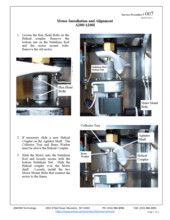
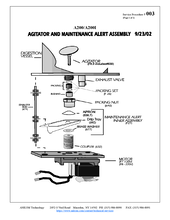
Check that the motor fan is spinning (refer to the A200 internal components document below). If the motor is not spinning, turn off and unplug the instrument. Then, loosen the brass packing nut 1/2 turn and check the wiring connections to the motor. Plug the instrument back in and press the Agitate button. If the motor starts to turn, reset the packing nut. Refer to Service Procedure Packing and Agitator Replacement (DES002) for instructions. If the motor does not turn after loosening the packing nut and the wiring connections are good, replace the motor. Refer to A200 Service Procedure Motor Installation and Alignment (FS007) for instructions.
Check that the agitator shaft is spinning. Refer to the A200 internal components document below, Look between the maintenance alert collector and the helical coupler. If the motor fan is spinning, but the agitator shaft is not spinning, then one or both set screws on the helical coupler need to be tightened. Turn off and unplug the instrument before tightening the set screws.
(2) The actual temperature has exceeded the ETS capacity and must be replaced.
To replace the ETS, remove the back panel of the instrument and locate a black object bolted to the upper left side of the vessel (refer to A200 internal components). NOTE: Attached to the bottom of the ETS is an orange wire and attached to the top is a cloth-covered wire. Disconnect the existing ETS and install a new one in its place.
Possible Causes:
Motor wires are loose or disconnected. Unplug the instrument. Inspect the wiring to the motor. Contact ANKOM Technology if a loose or disconnected wire is found.
If the wires are intact, run this test: Turn the instrument on and press the blue Agitate button. Check to see if the motor is turning (The fan at the bottom of the motor will spin if the motor is turning).
The Motor Set Screw(s) is too loose. If the motor is turning but the agitator is not, you will need to tighten the set screw(s) on the gray coupler with an Allen wrench. Note: Be sure to unplug the instrument before tightening the set screws.
The Packing Nut is too tight. If the motor is not turning when the "Agitate" button is pressed, you may need to loosen the brass packing nut.
- Unplug the instrument.
- Loosen the brass packing nut to turn it easily with your fingers.
- Reach down into the vessel and twist the agitator disk back and forth a couple of times
- Plug the instrument back in.
- Turn the instrument on and press the blue "Agitate" button.
- If the agitation begins, tighten the brass packing nut until you hear the motor begin to labor (you will hear the tone of the motor change slightly). When the tone changes, loosen the brass packing nut 1/8 of a turn and the tone will change back. This is the appropriate tightness.
- The agitator may have corrosive buildup. If periodic maintenance was ignored and the acid solution was allowed to leak into the packing assembly, the shaft may become "frozen". Check for corrosive buildup. The packing set and agitator may need to be replaced.
The Motor may have failed. This is a bit unusual and each of the above possibilities should be investigated thoroughly before ordering a motor. If all the above steps have been reviewed and the agitator still does not turn, the motor must be replaced.
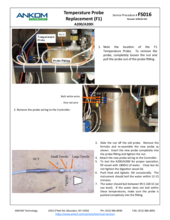
For illustrations of melted trays, see A200 Service Procedure Temp Probe Replacement (FS016). Bag suspender trays can melt when there is not enough solution in the vessel to cover all of the trays while the instrument's heat is activated.
Possible Causes:
- The user operating the instrument did not put enough solution into the vessel to cover all of the trays.
- The exhaust valve is slightly open and some of the solution slowly drips out of the vessel during the extraction.
- The red heat button is not turned off at the end of the extraction after the solution has been drained from the instrument and the trays are left in the instrument.
- There is an adequate amount of solution, and the heat is on, but the agitation is not turned on.
If the bag suspender trays are melted, you should do the following:
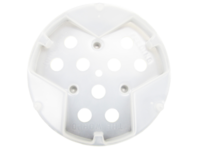
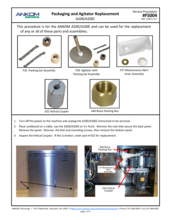
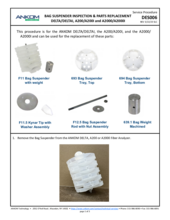
(1) Replace the melted trays. Find the necessary parts via the links below for:
- Bag Suspender w/ weight (Part #: F11)
- Bag Suspender Tray (bottom) (Part #: 693)
- Bag Suspender Tray (top) (Part #: 694)
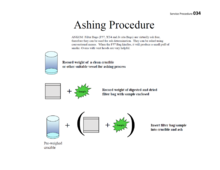
(2) Inspect the inside of the vessel to determine if any plastic melted to the walls. If so, fill the vessel with water and turn on the heat until the water boils. Turn off the heat. Carefully scrape the plastic from the walls and remove the plastic pieces. Drain the water and wipe out any remaining plastic residue.
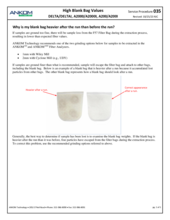
The Blank Bag Correction allows for a weight adjustment based on actions that take place during solubilization. The resulting factor increases or decreases your sample bag weight. To determine the blank bag correction, include at least one empty, sealed, and weighed filter bag (blank bag) with your run.
After the samples and blank bag have been through the solubilization process and dried as required, calculate the blank factor as follows: divide the final weight of the blank bag by the initial weight. If the samples have been properly prepared, blank factor values should fall below 1. If blank factors are greater than 1.0, refer to DELTA/A2000/A200 Service Procedure High Blank Bag Values.
Troubleshooting? Let us help!
For the most efficient and quick way to determine what your instrument issue is, it is important to fill out the diagnostic questionnaire below and submit to our analytical service form. Our team will review and get back to you with help!
Parts & Consumables
Browse the A200 Product Catalog for associated parts and support items
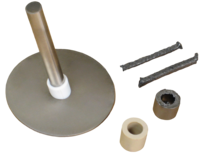
Agitator w/ Packing Set
This set creates a seal to keep solution from leaking from the vessel into the interior cabinet.
Instrument Performance Test
Ensure proper function of the instrument and correct procedural technique

SDS Sheets
Available product documentation and safety information

Service Procedures


How can we help?
Don’t see what you need on this page?
Search for a specific topic to search all resources.