XT15 Support


Top Five FAQs
Refer to XT15 Service Procedure Fault – ETS (X5S016).
Note: Older XT15 software may present variations in fault wording. Should technical service be required, please photograph the fault screen so the technician can verify the software version.
Possible Causes:
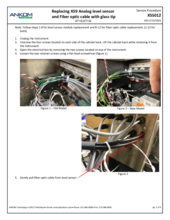
(1) The level sensor has failed to detect the liquid that is in the vessel. If the vessel is full and this fault screen appears, press <STOP> to drain the fluid. You may want to capture the solution and re-use it. Refer to DELTA Service Procedure Analog Level Sensor (Black Model) (AS008). Or, see A2000 Service Procedure Level Sensor (SICK) Cleaning and Testing (AS010) for SICK brand level sensor (Blue) installation instructions.
(2) Water or solution supply is inadequate. Replace the cubitainers if they are empty. Check to see if the water supply is turned on.
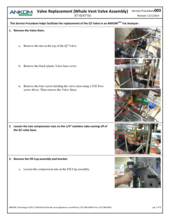
(3) Water supply valve may not be functioning. With the bag suspender removed from the vessel, press <ENTER> to try again. Once liquid is observed flowing into the vessel, (replace the bag suspender if performing a rinse) and close the lid. If no liquid is flowing into the vessel, the fill valve or the water valve may not be functioning. Refer to A2000 Service Procedure Water and Vent Valve Service (AS016).
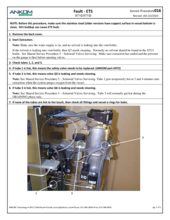
There is a leak. The most common cause is a leaky Q1 valve, which would cause cooling water to flow into the vessel during the heating stage.
To test:
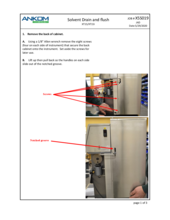
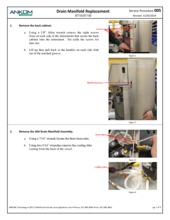
Turn the instrument completely off but keep the water supply on. Check to see if water is running out of the drain line. Water should not be running out of the drain line if the instrument is off. If it is, then you need to inspect and clean valves Q1, Q2, and Q3 (Q1 is the most important). To inspect the valves, turn off the water supply and refer to XT15 Service Procedure Drain Manifold Replacement (X5S005).
After inspecting the valves, turn your water supply back on and verify that no water is running through the drain line while the instrument is off. Run an extraction. If the vessel is not heating, contact ANKOM.
Note: Older XT15 software may present variations in fault wording. Should technical service be required, please photograph the fault screen so the technician can verify the software version.
Crude Fat results could be low for any of the following reasons:
- The extraction was not run long enough.
- The sample was not post-extraction dried enough.
- Fat migrated from a bag during the pre-dry step.
- Desiccant was either not used or incorrectly used during the post-dry phase.
- The water was not turned on or the flow meter was turned down.
- There was too much sample in the bags or too many bags in the instrument.
There are three primary reasons for high Crude Fat results.
(1) The bag is not completely sealed; therefore the sample gets lost during extraction.
(2) A bag picks up surface fat from another sample.
(3) Incomplete drying in the pre-extraction phase. This is the biggest contributor to high crude fat results. All the moisture in the sample must be removed before the extraction because the ANKOM technique uses the indirect method of determining fat (weighing what is left over after the fat has been extracted). It is good to regularly check your moisture (dry matter) values when performing fat extraction using ANKOM instrumentation. This can be done by simply weighing and recording the weight of the Filter Bag before filling it with the sample. After the three-hour drying step, when you re-weigh the bags plus the sample, the following formula will give you the moisture value:
100 x ((Filter Bag Weight + Sample Weight) - Weight After Drying) / Sample Weight
We suggest each lab regularly test this analysis by utilizing a check sample or lab standard. Low moisture values tend to be due to:
- Not using or incorrectly using desiccant pouches
- Incorrect oven temperature settings (should be between 100 - 105°C)
- Hot or cold spots in the oven
- The oven is being overloaded with other samples or glassware
Troubleshooting? Let us help!
For the most efficient and quick way to determine what your instrument issue is, it is important to fill out the diagnostic questionnaire below and submit to our analytical service form. Our team will review and get back to you with help!
Parts & Consumables
Browse the XT15 Product Catalog for associated parts and support items
Preventative Maintenance Kit
Essential items needed to keep your instrument operating smoothly

High Pen Preventative Maintenance Kit
Parts and instructions for the high-penetration XT15 Fat Extractor
Instrument Performance Test
Check samples ensure proper function of the instrument and correct procedural technique
Service Procedure


How can we help?
Don’t see what you need on this page?
Search for a specific topic to search all resources.